In this project, school-aged kids will create a spooky hexagon using radial and reflective patterns and a simple triangle shape. This mess-free project is easy to complete at home or in the classroom.
Creating Rotational and Reflective Patterns
Rotational Patterns are those that are focused around one central point.
Reflective Patterns are created when the shape is reflected on a line of symmetry, as in a mirror.
This project uses triangle shaped “tiles” to form both a pattern that rotates around a central point and reflects on lines of symmetry. Together these triangles create our spooky hexagon design!
Related Link – For more basic pattern art ideas, check out our lesson on tessellations.
Supplies Needed to Make a Spooky Hexagon Art Project
- Tracing Paper
- Cardstock – cut into a triangle (Free Template Download Below)
- Pencil
- Coloring Medium of Choice – colored pencils, crayons, etc.
- Permanent Marker
- Scissors
- Optional: Tissue, Glue, White Cardstock
Download the Triangle Template Printable Here
Print these basic triangle “tile” shapes onto cardstock. This printable makes it easier for kids to cut and design a tile for their patterned project.
Directions to Make Spooky Hexagon Art
Step 1
Use a pencil to lightly sketch a design on the cardstock triangle shaped tile. Draw half a symmetrical image on the side of the triangle to see it completed in the pattern!
Step 2
Use a permanent marker to trace over the pencil drawing. Flip over the triangle and trace the design again onto the back side of the tile.
Step 3
Next, place tile under tracing paper and trace design. Flip the tile over and align it next to the first triangle, top points touching. Trace again. Repeat until design is complete and a hexagon shape is formed.
By keeping triangle points touching at the top, a rotational pattern begins to form.
By flipping the tile over with each turn, the reflection portion of the pattern begins to form shapes.
Step 4
Trace over pencil drawing using a permanent marker. Erase any unwanted pencil lines.
Step 5
Use medium of choice to add color to the drawing.
Step 6 (Optional)
If desired, add a few finishing touches to the project.
- Heavily applied crayons or colored pencil marks may appear shiny (this technique is called burnishing). Kids can smooth out the shiny finish by rubbing the entire image with a soft tissue.
- Carefully cut out hexagon design and glue to a sturdy piece of white cardstock. The white background really brings out the colored design.
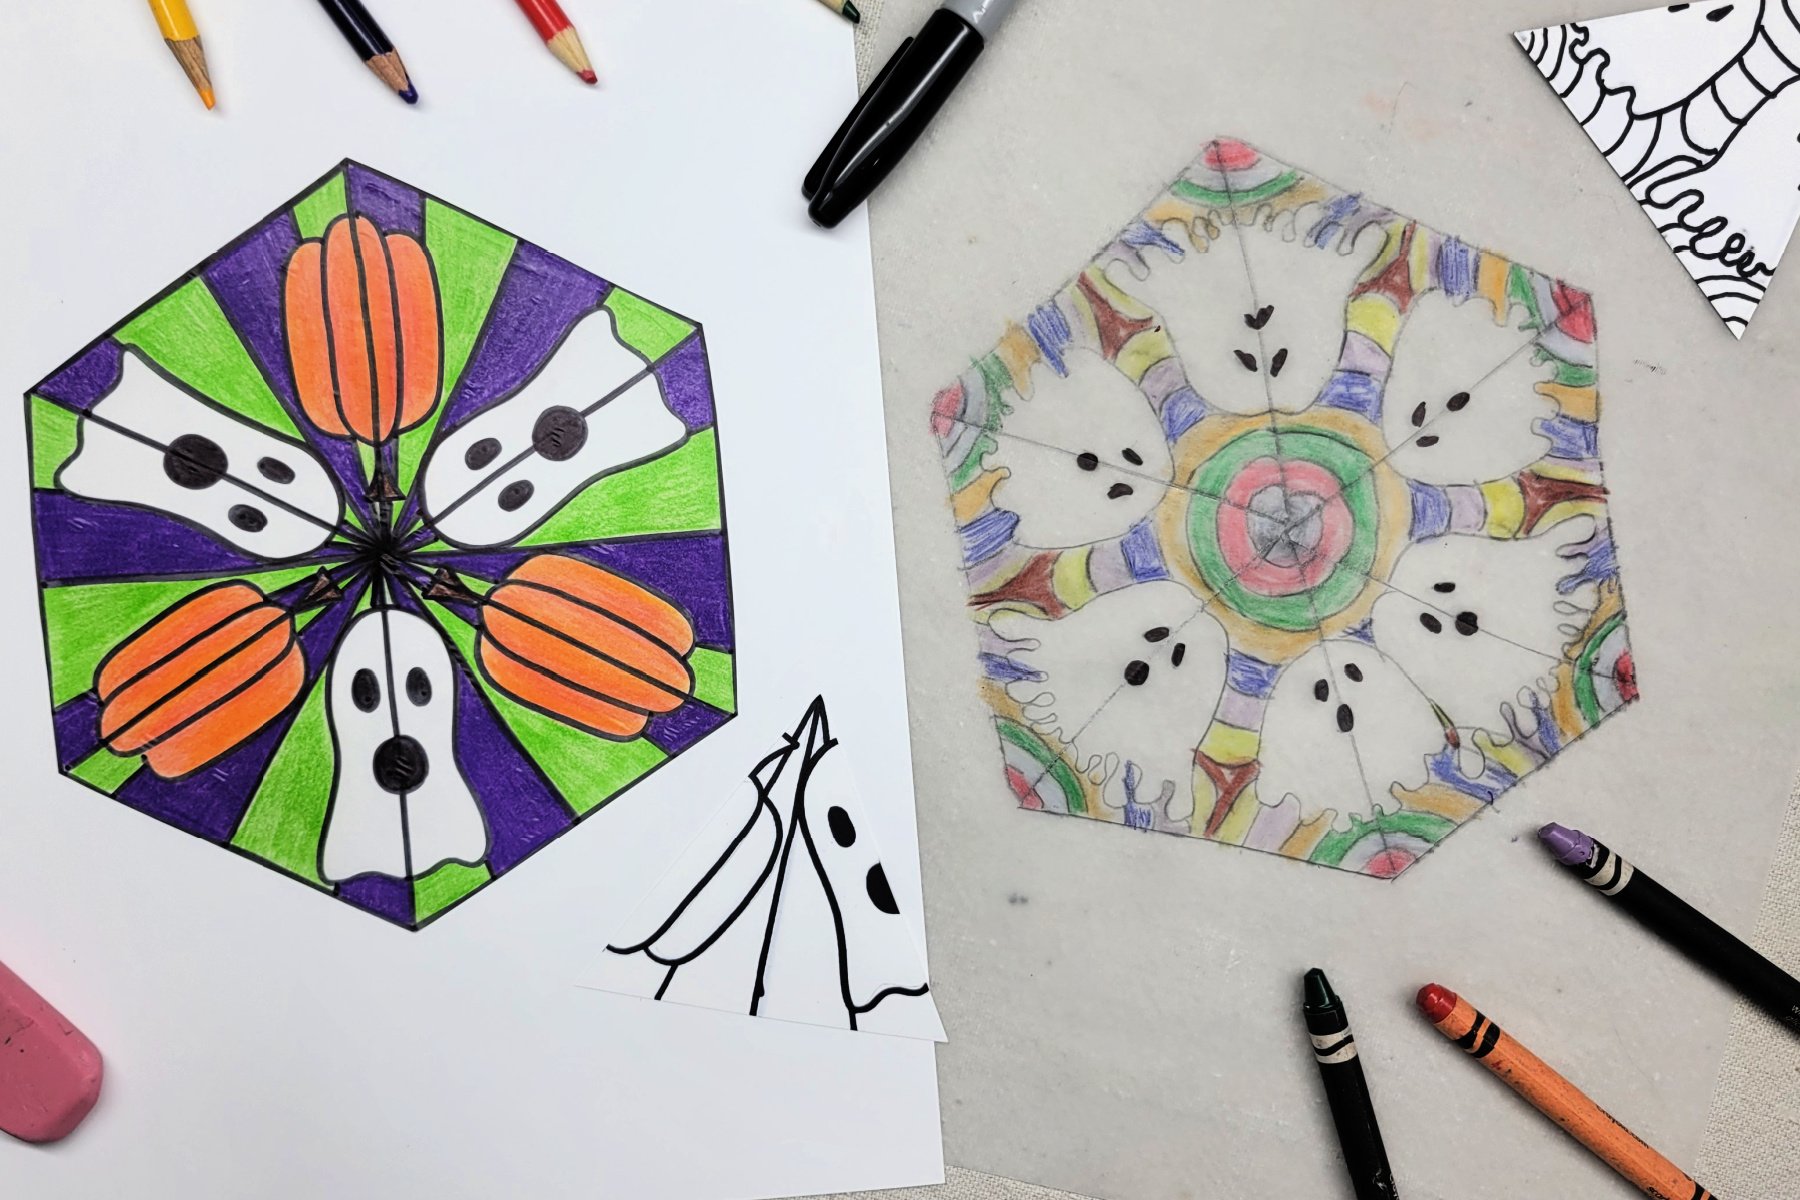
Finished Spooky hexagon Art Project
Our completed spooky hexagon masterpieces! Since these projects are made on paper, they are easily framed, clipped, or displayed in your preferred style.
Our Experience Making this Spooky Hexagon Art Project
I like that this project teaches how shapes and patterns work together. Many of my students often find that art includes math and science in many ways. It’s always a joy when I hear students making these connections, talking about their discoveries, and getting excited over their patterns fitting together.
Prep Time
5 minutes
Active Time
30 minutes
Total Time
35 minutes
Difficulty
Medium
Estimated Cost
$1
Materials
- Tracing Paper
- Cardstock – cut into a triangle
Tools
- Pencil
- Coloring Medium of Choice – colored pencils, crayons, etc.
- Permanent Marker
- Scissors
- Optional: Tissue, Glue, White Cardstock
Instructions
- Use a pencil to lightly sketch a design on the cardstock triangle shaped tile. Draw half a symmetrical image on the side of the triangle to see it completed in the pattern!
- Use a permanent marker to trace over pencil drawing. Flip over the triangle and trace the design again onto the back side of the tile.
- Place tile under tracing paper and trace design. Flip the tile over and align it next to the first triangle, top points touching. Trace again. Repeat until design is complete and a hexagon shape is formed.
- Trace over pencil drawing using a permanent marker. Erase any unwanted pencil lines.
- Use medium of choice to add color to the drawing.
- Optional: Add finishing touches to the project.
- Heavily applied crayons or colored pencil marks may appear shiny (this technique is called burnishing). Kids can smooth out the shiny finish by rubbing the entire image with a soft tissue.
- Carefully cut out hexagon design and glue to a sturdy piece of white cardstock. The white background really brings out the colored design.
Notes
Spooky Hexagon Art Variations
- Use carbon paper to transfer drawing from tracing paper to thicker paper where project can be completed with heavier or wet mediums.
- Use a lightbox or sunny window to transfer images instead of tracing paper.
- Continue adding triangles outside of the hexagon to fill the page with your spooky pattern!
Other Fun spooky Art Projects from Kids Activities Blog
Did your kids enjoy creating these spooky hexagons? What designs did they draw on their triangle?