Today we are making a DIY koozie! You can make a bottle koozie or even a can koozie. Either way, kids of all ages will love making and decorating their very own koozies, though these are even better than the original, because these DIY koozies have straps! You can carry water bottles, cans, whatever you’re drinking around and keep it cold! You can make these at home, at school, at church, even at camp!
DIY Koozies
We are koozie family. There are so many cute ones to collect. So, we decided to make our own. This DIY koozie craft is great for making bottle koozies or even can koozies. However, this craft is better suited to older kids and kids that know how to sew.
We do use a sharp item to make this craft so it may not be suited to young children. But, this DIY koozie craft is a great way for your child to make something neat, and maybe even a gift to a loved one, but it is also great fine motor skills practice. So, without further ado, let’s make our DIY koozies with straps.
This post contains affiliate links.
Related: Have you tried making our camp themed necklaces?
Supplies Needed To Make These DIY Koozies With Straps
How To Make Your Very Own Koozie With Colorful Straps
Step 1
Roll the foam over your bottle and can and see how much you will need to wrap it around. Add about a 0.25-0.50 of an inch so you have extra to sew on. You can trim it later.
Mark this spot with your pen.
Step 2
Measure the length now and leave about 0.25-0.50 inches so you have extra to sew. You can see where I made an extra mark to give myself a little extra room. Don’t worry, no one will see this mark.
Step 3
Cut out the foam.
Step 4
Trace the bottom of your container with a pen on the same color foam. Now add a new circle around it, again, leaving about 0.25+ inches to sew with. Cut it out.
Step 5
Thread your embroidery needle. Do this by cutting a long piece of string. Thread 1 end through the needle’s eye. Once in pull the needle until it’s halfway across the string and tie the ends to a know.
Step 6
Put your rectangle on your circle, pens facing in. You will now put the needle through the pen side, first through the circle and then make a stitch by moving the needle through the front of the rectangle, pull all the way through.
Note:
Don’t pull too tight or you’ll rip the thread through the foam.
Do this until you have sewed the bottom onto the side. You will have to maneuver the rectangle a bit while sewing to sew around the circle. Tie a knot when you’re done. The easiest way is to cut the thread leaving about 1 inch and tying it that way.
You can also knot it by putting the needle through a stitch, pull, put the needle through the hole you made, and pull. I do this twice to make a knot.
Step 7
Rethread your needle and start sewing up the side of the bottle. Starting from the bottom is easiest. Pull the needle through the bottom (pen side) and then push it through the top and pull.
Do this until the side is sealed and then knot the thread.
Step 8
Using the hole punch, punch 2 holes on both side of your koozie.
Step 9
Cut 4 long pieces of yarn. We used about 1.5ft. Tie them together at the end leaving 1-2 inches of fringe.
Step 10
Fish tail braid your yarn. You will have 4 pieces laying. Pull the 2 outside to the middle and cross them, now pull the new outside pieces to the middle and cross them. Keep doing this until you have the desired length. Then knot, leaving 1-2 inches.
Note:
Putting something heavy on the end will make it easier to braid. Also, make sure you run your hand down your yarn to untangle the bottom after each braid.
Step 11
Using the fringe, poke 2 out of 4 pieces of fringe through the hole on the side. Tie a knot. Do the same for the other side.
Step 12
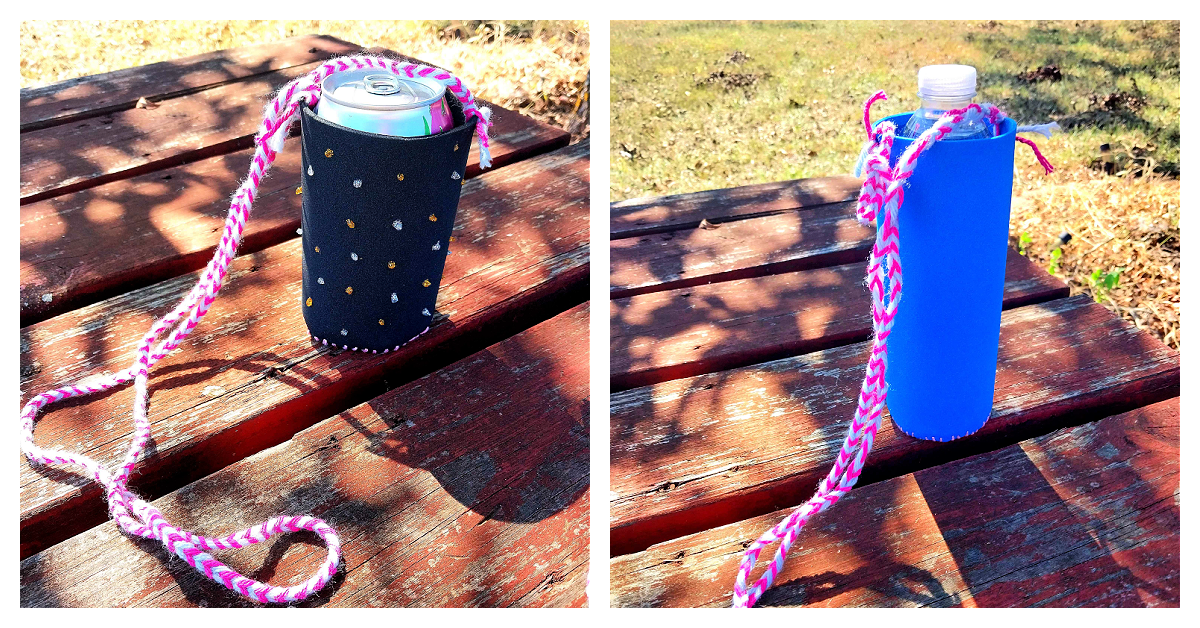
Decorate! You can leave your koozie plain, you can use all sorts of things to decorate your koozies. We decorated one of ours with glitter glue and left the other plain. Once you’re done decorating, you’re done! Carry your drink with style!
Craft Note
Follow the same steps to make a DIY koozie for cans. Just trace and measure for the can instead of the bottle. You can even make a DIY koozie for reusable bottles too.
How To Make This Homemade Koozie Your Own
Just like every other craft, you can easily change this DIY koozie craft up and make it your very own. There are so many changes you can make like:
- Using different colored foam.
- You can use any type of string like paracord, yarn, twine, etc.
- Add stickers or decorate your koozie with markers.
- Sew it shut with a yarn needle and yarn.
- Try it with different materials like felt, canvas, etc.
- Add bows using fabric pieces or wrap a piece of fabric around it to make your own design.
- Glue on buttons to make a fun design on the outside.
- Decorate with stickers, faux gems, paint, etc.
Our Experience Making DIY Koozies
This is a good koozie craft. Kids can make their own drink holders. Which we needed, because the weather is so nice right now, and we are spending so much time outside. And you have to have a drink you can carry around when you’re hiking and camping! Which is why this DIY koozie craft is so perfect.
This tutorial is great for older kids. I won’t lie, younger kids will have a harder time with this. But my older kids were so sweet and made their siblings their own because they are still a little too young to be using needles.
The best part is, besides making your own custom koozies, you can literally give these as gifts for a party favor, Christmas, birthday, Mother’s Day, Father’s day. You name it. And the strap is a convenience because you can wear it like a purse or wear it across your body and you can make your strap as long or short as needed.
Materials
- Large Sheets Of Foam
- Embroidery Thread
- Embroidery Needle (Or Crochet Needle)
- Glitter Glue
- 2 Colors of Yarn (We used a light blue and a pink)
- Pen
- Empty Water Bottle or Can
- Scissors
- Hole Punch
Instructions
- Roll the foam over your bottle and can and see how much you will need to wrap it around. Add about a 0.25-0.50 of an inch so you have extra to sew on.
- Mark this spot with your pen.
- Measure the length now and leave about 0.25-0.50 inches so you have extra to sew. You can see where I made an extra mark to give myself a little extra room.
- Cut out the foam.
- Trace the bottom of your container with a pen on the same color foam.
- Now add a new circle around it, again, leaving about 0.25+ inches to sew with. Cut it out.
- Now, thread your embroidery needle.
- Now, put your rectangle on your circle, pens facing in. Put the needle through the pen side, first through the circle and then make a stitch by moving the needle through the front of the rectangle, pull all the way through.
- Do this until you have sewed the bottom onto the side. You will have to maneuver the rectangle a bit while sewing to sew around the circle.
- Tie a knot when you’re done. The easiest way is to cut the thread leaving about 1 inch and tying it that way. You can also knot it by putting the needle through a stitch, pull, put the needle through the hole you made, and pull. I do this twice to make a knot.
- Now, rethread your needle and start sewing up the side of the bottle.
- Pull the needle through the bottom (pen side) and then push it through the top and pull. Do this until the side is sealed and then knot the thread.
- Using the hole punch, punch 2 holes on both side of your koozie
- Cut 4 long pieces of yarn.
- Tie them together at the end leaving 1-2 inches of fringe.
- Fish tail braid your yarn. You will have 4 pieces laying. Pull the 2 outside to the middle and cross them, now pull the new outside pieces to the middle and cross them. Keep doing this until you have the desired length. Then knot, leaving 1-2 inches.
- Now, using the fringe, poke 2 out of 4 pieces of fringe through the hole on the side.
- Tie a knot.
- Decorate! Now your koozie is ready!
More Camping Fun From Kids Activities Blog
How did your DIY koozies turn out? Did you make them for cans or bottles?