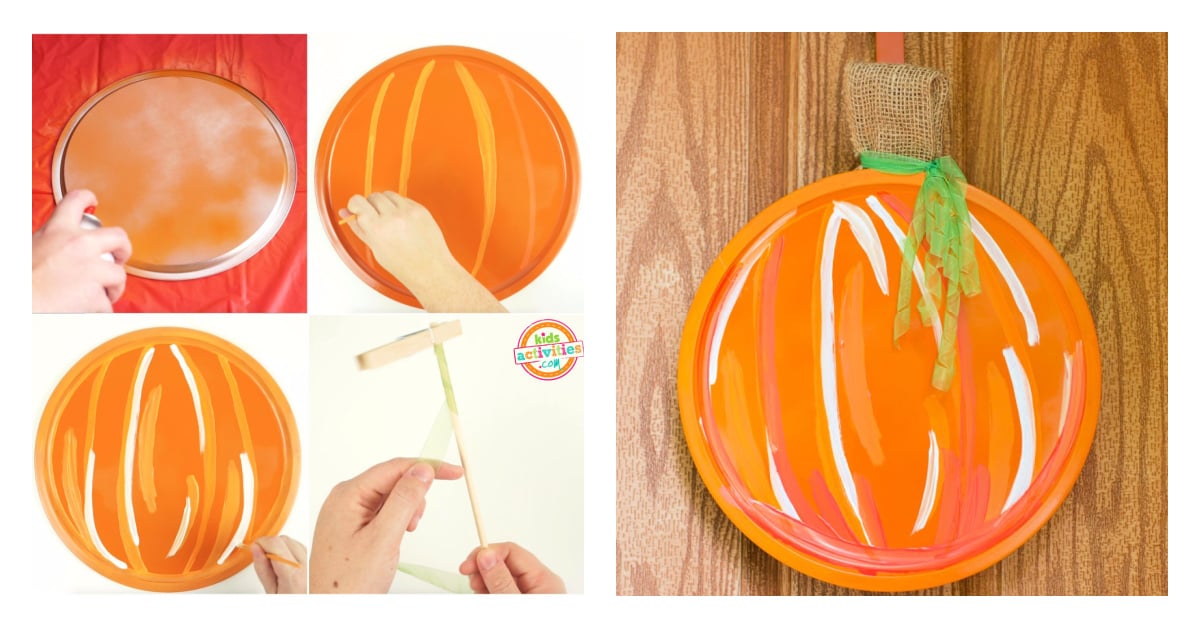
This autumn colors pumpkin door hanger decoration craft makes the cutest pumpkin door hanger that will work perfect for your front door. Kids of all ages can make this simple pumpkin door hanger that takes a pizza pan and a few supplies within minutes. This pumpkin door hanger is a fun pumpkin craft to make together as a family or in the classroom and makes a really nice gift.
?DIY Pumpkin Door Decoration
This Fall, turn a pizza pan from the Dollar Store into a cute pumpkin door hanger! I just love decorating for Fall — pumpkins, leaves, burlap, and all things Autumn. And even the simplest item (like a pizza pan!) can be transformed into an adorable pumpkin with just a few steps!
This article contains affiliate links.
Supplies Needed To Make This Super Cute Pumpkin Door Hanger
Directions to Make a Pumpkin Door Hanger
Step 1
Start by spray painting the pan with a base coat of orange and allow to dry completely. Repeat on the other side. Add a second coat to reach desired coverage.
Step 2
Once dry, use the paint marker to outline the five sections of your pumpkin.
- Go over those lines with the orange acrylic paint — thickening them up.
- Paint around the outside edge of the pan, too.
- Add accent lines in each section with the orange paint.
- Then add some accent lines in white paint.
- Finally, mix a bit of red paint into the orange paint and add some dark lines to the bottom of the pumpkin to give the appearance of shadows.
Step 3
Seal with the clear sealer once dry.
Step 4
Secure one end of the green ribbon to the end of a dowel rod with a clothespin. Wrap the ribbon tightly around the dowel rod, overlapping each layer slightly. Cut and secure the other end with a clothespin.
Place on a baking sheet and bake at 250 degrees F for 15-20 minutes. Once cool, remove the ribbon from the dowel rod — you now have a curled ribbon for the “vine” of your pumpkin!
Step 5
Cut a square of the burlap and fold it in half vertically — this will be the stem of your pumpkin. Use the hot glue gun to secure it to the back of your pan pumpkin.
Step 6
Tie the curled green ribbon around the burlap so that it hangs on one side and looks like a vine growing out of the stem. Secure with hot glue.
Now your pumpkin is ready to hang!
Finished Festive Pumpkin Door Hanger Craft
This pumpkin door hanger is great whether you’re celebrating fall or Halloween! It’s cute, easy to make, and most of the items you can find at places like Dollar Tree. Plus, if you really wanted to you could make this pumpkin door hanger a little creepy for Halloween! Just paint on a jack-o-lantern face using acrylic paint and a thing brush or acrylic paint pens.
Active Time
15 minutes
Total Time
15 minutes
Difficulty
Medium
Estimated Cost
$5
Materials
- Round Pizza Pan
- Orange Spray Paint
- Orange Paint Marker
- White Acrylic Paint
- Orange Acrylic Paint
- Red Acrylic Paint
- Green Ribbon
- Burlap
Tools
- Paintbrushes
- Clear Sealer
- Hot Glue Gun and Glue
- Dowel Rod
- Clothespins
Instructions
- Start by spray painting the pan with a base coat of orange and allow to dry completely. Repeat on the other side. Add a second coat to reach desired coverage.
- Once dry, outline the details of the pumpkin making 5 sections to your pumpkin going over the lines with orange acrylic paint thickening them up and then adding paint to the edges of the pan and accent lines.
- Add white accent lines
- Mix in a bit of red paint for accents as well.
- Seal once dry.
- Curl green ribbon by wrapping around dowel and fixing with clothespins and then placing in oven on baking sheet at 250 degrees for 15-20 minutes. This will set the curl of the ribbon.
- Add burlap stem and ribbon as decoration securing with hot glue.
MORE PUMPKIN CRAFTS & FUN FROM KIDS ACTIVITIES BLOG
If you loved this pumpkin craft, you’ll also love our list of 30 Pumpkin Activities for Kids <– there are so many cute ones to choose from!
How did your pumpkin door decoration craft turn out?

