Let’s make these cool chalk rocks today! I can’t remember where I first saw balloon sculptures made from plaster-filled balloons. I just knew I wanted to try this with my kids and make chalk rocks. I couldn’t wait until my kids were old enough to do this chalk making activity.
How to Make Chalk Rocks
This activity requires adult supervision. Because there are things that need to be supervised closely when making chalk rocks, we waited until our kids were 4 years old to do this activity.
Related: Make sidewalk chalk that fizzes!
Safety Warning When Handling Plaster of Paris
The plaster is dangerous if inhaled in it’s original state and after it is mixed can get VERY hot. Wait until your kids are able to follow directions and/or have another adult to help.
Supplies Needed to Make Rock Chalk
- Bucket of Plaster of Paris – we mixed it 2 cups at a time
- Disposable dish and utensils
- Water
- Funnel
- Balloons
- Bucket of Water – for rinsing any plaster bits that might get on your skin ASAP.
Directions for Chalk Rocks Kids Craft
Video: How To Make Chalk Rocks
Step 1
Mix the plaster and the water together by the directions on your container.
Step 2
Add food coloring and mix quickly.
Tip: It should look the consistency of pancake batter. Runny and some small lumps are okay. Add dye to your plaster – use more than you intend for the final product. It will lighten considerably in the finished product.
Step 3
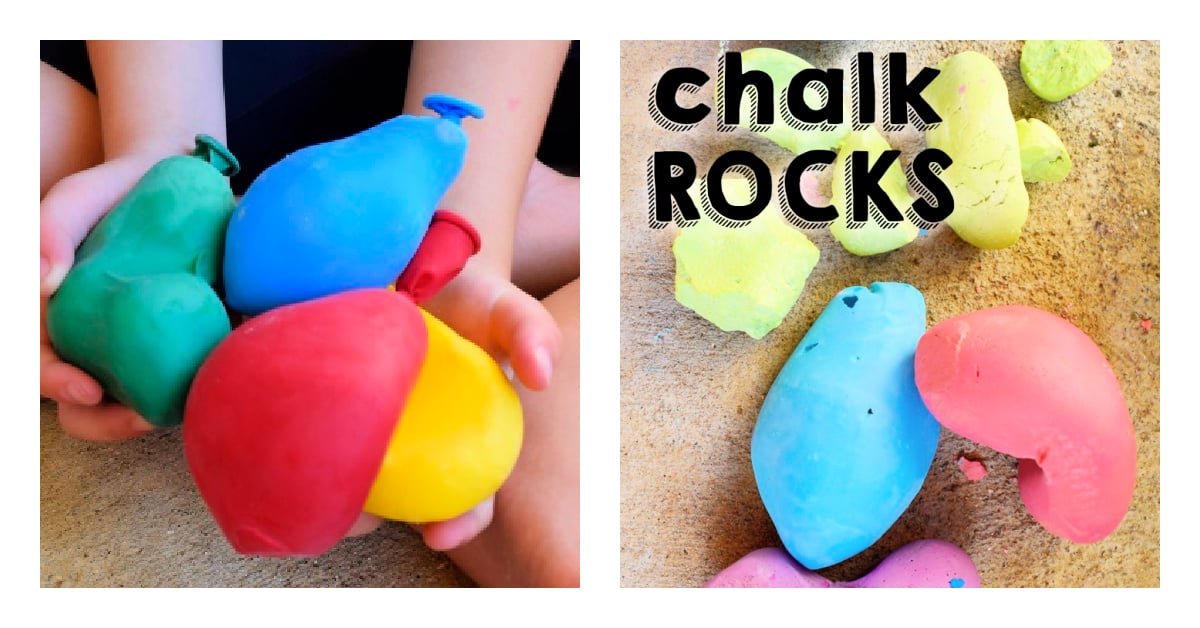
Put the balloon around the mouth of your funnel. Spoon the plaster into the balloon.
Step 4
We had to bang the side of the funnel to ensure that the plaster filled the balloon. Tie off the balloon.
Step 5
Then your kids get to squish the balloon until it gets really warm. Once it is warm, try to form it into the shape you want the chalk rock to be when you are done. If it is too warm put the balloon down – most likely it is already set at that point.
Step 6
Wait a full 24 hours and then cut the balloon from the chalk rocks to reveal your artistic creation. Have fun coloring!
Materials
- Bucket of Plaster of Paris â we mixed it 2 cups at a time
- Disposable dish and utensils
- Water
- Funnel
- Balloons
- Bucket of Water â for rinsing any plaster bits that might get on your skin ASAP.
Instructions
- Mix the plaster and the water together by the directions on your container.
- Add food coloring and mix quickly.
- Put the balloon around the mouth of your funnel. Spoon the plaster into the balloon.
- We had to bang the side of the funnel to ensure that the plaster filled the balloon. Tie off the balloon – sorry, I couldn’t get that on video tape – not enough hands!
- Then your kids get to squish the balloon until it gets really warm.
- Wait a full 24 hours and then cut the balloon from the chalk rocks to reveal your artistic creation.
Notes
This is a semi-dangerous activity, which is why we waited until our kids were nearing four to do this activity.
The plaster is dangerous if inhaled in itâs original state and after it is mixed can get VERY hot. If you have triplets like I do, wait until your kids are able to follow directions and/or have another adult to help.
MORE CHALK ACTIVITIES FROM KIDS ACTIVITIES BLOG
Did your kids enjoy this fun activity? Let us know in the comments below, we’d love to hear!