Foil art is a fun way to make colorful and shiny art. Kids of all ages will love making their own creative and colorful foil art. This simple craft requires only a few crafting supplies. Make shiny unique art that you can color anyway you want with infinite designs! You can make this easy foil art at home or in the classroom.
Easy Foil Art
Foil art will allow children to experience a new art medium while practicing fine motor skills. They will be able to draw, outline (though younger kids will need assistance), trace, and color! Which in turn, allows your kids to explore different colors, textures, and sights as well. How fun!
You can draw any images you like. We have so many different “how to draw” printables that will help you draw the perfect picture on your cardboard before you cover it in foil.
This post contains affiliate links.
Related: Make these painted foil hearts!
Supplies Needed To Make Fun Foil Art
*Optional: One of our “How to draw” printable templates. Or you can free hand your pictures like we did.
How To Make Colorful and Easy Foil Art
Step 1
Cut down some cardboard into a square.
Step 2
Draw a picture on your cardboard using a marker.
Craft Notes:
It’s okay if it isn’t perfect, you can draw over mistakes. It’ll be covered up.
Step 3
Go over the lines with a hot glue gun being very careful.
Craft Notes:
Young kids should not handle the hot glue guns. You can do this for them and they can do the rest of the craft.
Step 4
Fold tin foil over the cardboard once the glue dries and press down and smooth it around the glue imprints.
Craft Notes:
The shiny side should be up.
Step 5
Color your picture going around glue. Leave the imprints uncolored.
Step 6
Color the outside of the image too. And you’re finished!
Craft Note:
Make sure when using permanent markers for prolonged uses to be in a well ventilated area or have a fan going with a window open.
How To Make This Foil Art Craft Your Own
Just like all our crafts you can change things about this foil art craft to make it your own. You can do things like:
- Instead of following one of our how to draw tutorials copy one of our coloring pages to make fun art.
- Put this on a big piece of cardboard and hang it as decor once your draw it.
- You could paint on the piece of foil instead of using sharpies.
- Use a colorful foil sheet instead of foil.
- Use craft glue to make glue lines. Elmer’s glue or tacky glue will work, but takes longer to dry.
- Glue yarn on the outlines instead of using hot glue gun.
- Use the side of a cardboard box or a cereal box to make a beautiful piece of art. It doesn’t have to be square.
Our Experience With This Super Neat Foil Art Craft
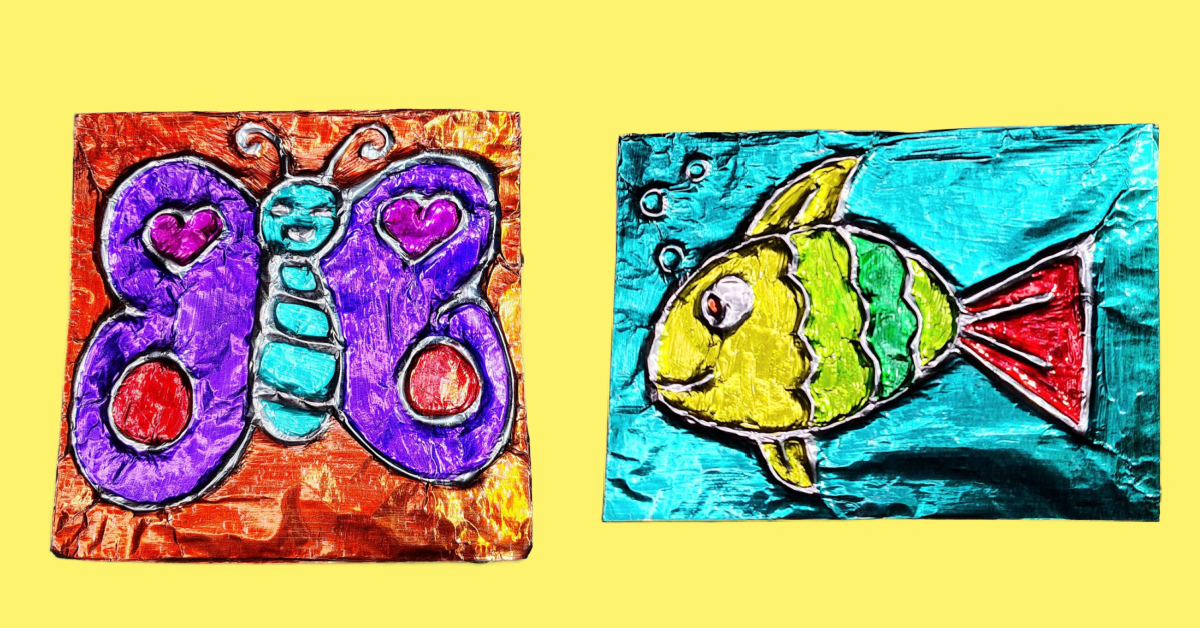
My kids wanted to do something different. And we’ve been painting a lot so I had to come up with a new craft. And while reading to them The Rainbow Fish and The Little Butterfly That Could, it gave me an idea. Let’s do butterflies and fish.
And while I could have printed off printables, I thought it would be fun to make some seriously unique art. I’ve seen different types of foil art and figured we could do something similar. And it didn’t require me to wait for a foil art kit from Amazon either, though we may do some of those because they’re cute.
But this foil art allows kids to make their favorite characters and draw unique images and decorate them. So I hope your family had as much as mine while making this foil are.
Materials
- Scissors
- Cardboard
- Permanent Markers
- Hot Glue Gun
- Aluminum Foil
- *Optional: One of our “How to draw” printable templates. Or you can free hand your pictures like we did.
Instructions
- Cut down some cardboard into a square.
- Draw a picture on your cardboard using a marker.
- Go over the lines with a hot glue gun being very careful.
- Fold tin foil over the cardboard once the glue dries and press down and smooth it around the glue imprints.
- Color your picture going around glue. Leave the imprints uncolored.
- Color the outside of the image too. And you’re finished!
Notes
- It’s okay if it isn’t perfect, you can draw over mistakes. It’ll be covered up.
- Young kids should not handle the hot glue guns. You can do this for them and they can do the rest of the craft.
- The shiny side should be up.
- Make sure when using permanent markers for prolonged uses to be in a well ventilated area or have a fan going with a window open.
More Crafts From Kids Activities Blog
How did your foil art turn out?