Older school-aged kids focus on drawing facial features in this easy project. This practice project is easy to complete at home or in the classroom.
Drawing Facial Features
Drawing facial features can be a daunting task for many artists. This is a great introductory lesson for anyone wanting to draw completed faces. In this practice project, we’ve taken away pressure from drawing a completed face. Here, artists are able to focus on individual aspects of the face without have to consider proportions and how the features relate to one another.
Related Link – Practice shading skills using our free printable.
Supplies Needed to Make a drawing facial features Art Project
- Magazines
- Paper
- Scissors
- Glue Stick
- Pencil
- Eraser
- Optional: Blending Tool – such as tortillon, blending stump, cotton swabs, tissue, etc.
Directions to make this drawing facial features art project
Step 1
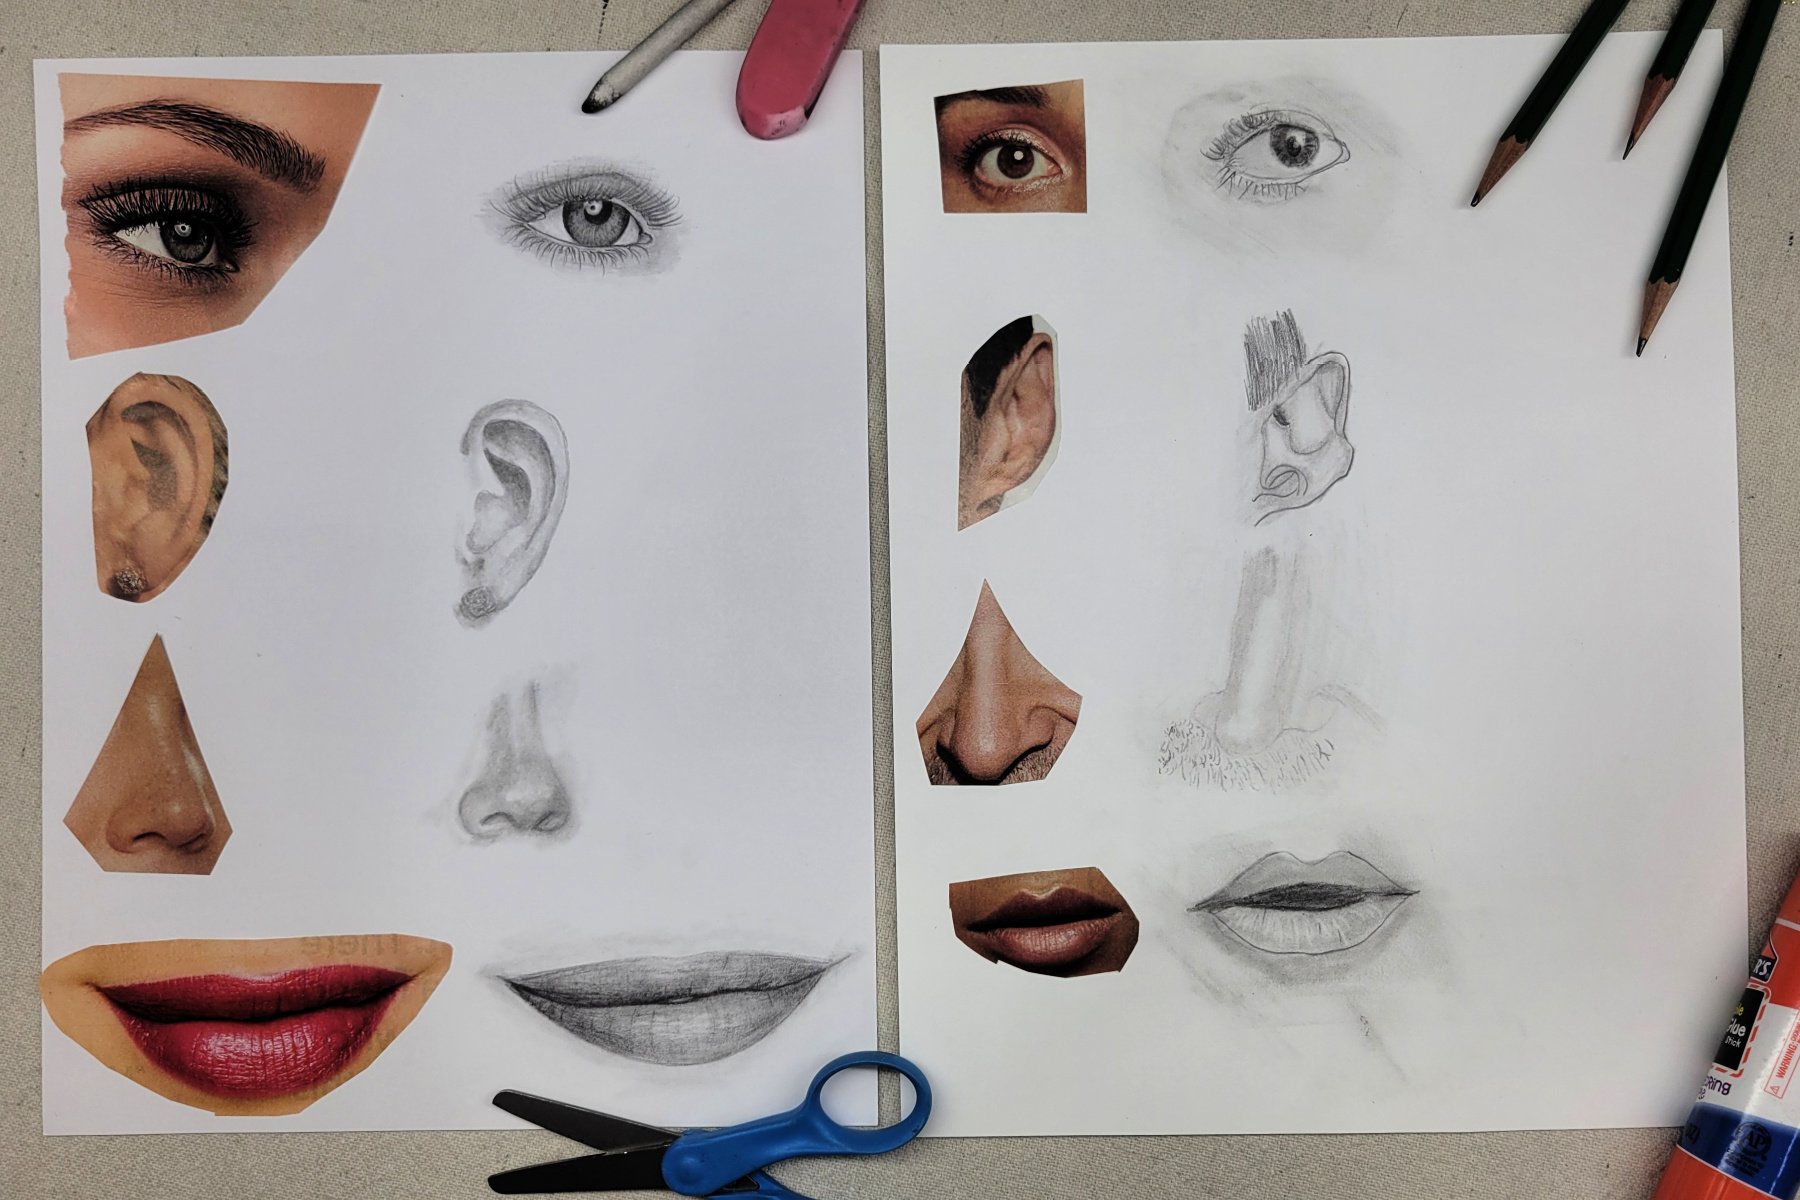
Kids use scissors to cut the following facial feature images from a discarded magazine: one eye, ear, nose, and mouth.
Note: Kids cut facial features from various images within the magazine. Do not cut all images from one face. Seek to find images that are larger where kids can easily see the details they will be drawing.
Step 2
Next, use a glue stick to attach cut images to a blank piece of paper.
Tip: Right-handed kids can attach images on the left of the page, while left-handed kids may want to attach images on the right side of the paper. Doing so will allow artists to better see the images while they are drawing.
Step 3
Artists use a pencil to lightly sketch a basic outline of facial features.
While any pencils will work for this project, if available, I encourage kids to use a harder lead (such as 4H) to create lighter sketch lines that are easily erased.
Step 4
Artists may find it helpful to use a pencil or other measuring devices to create a grid for better accuracy when drawing. To do this, simply place pencil on top of the original image, place tip of pencil at one end of area to be measured and fingertips at the other end. Then, move pencil to sketch area, keeping grip to not alter measurement, and lightly sketch guide lines.
Step 5
Next, use a pencil to add basic shadows to the sketches. If available, kids can explore different artists pencils, pressures, and techniques to complete their drawings. Artists achieve darker shadows by using a softer lead or applying more pressure when drawing.
Step 6
Continue to add layers to deepen shadows in the drawing. Be mindful to adjust pressure, pencils, and blend as needed.
Many artists blend drawings with premade tools like tortillons and blending stumps, or household items like cotton swabs and tissues. For larger areas, many artists use their fingers! Remember, this is only practice, making it an excellent time to explore various tools and techniques.
Step 7
Use an eraser to remove excess graphite for creating more intense highlights. While any eraser will work, kneaded erasers are moldable, allowing the artist to erase smaller areas.
Step 8
Finally, add any details and finishing touches to the drawings.
Finished Drawing facial features Art Project
I always love how this project turns out. Though we approach this as simply practice, it is still fun to display our kids’ skills. With this project being made on paper, it is easily framed, clipped, or displayed in your preferred style.
Our Experience Making this drawing facial features Art Project
I use this lesson each year to introduce my students to drawing facial features. I love that this project takes away the fear of drawing a completed face. When drawing a completed face, artists often aim to capture a likeness of their subject. Once kids are comfortable drawing facial features, we then move onto drawing faces as a whole.
Prep Time
5 minutes
Active Time
45 minutes
Total Time
50 minutes
Difficulty
Medium
Estimated Cost
$1
Tools
- Scissors
- Glue Stick
- Pencil
- Eraser
- Optional: Blending Tool – such as tortillon, blending stump, cotton swabs, tissue, etc.
Instructions
- Use scissors to cut images of an eye, ear, nose, and mouth from a discarded magazine.
- Use a glue stick to attach cut images to a blank piece of paper.
- Use a pencil to lightly sketch a basic outline of facial features.
- Optional: Use a pencil or other measuring devices to create a grid for better accuracy when drawing.
- Use a pencil to add basic shadows to the sketches.
- Continue to add layers to deepen shadows to the drawing. Be mindful to adjust pressure, pencils, and blend as needed.
- Use an eraser to remove excess graphite for creating more intense highlights.
- Add any details and finishing touches to the drawings.
Notes
Drawing Facial Features Art Variations
- Focus on only one feature at a time instead of adding clippings of all features to one page.
- Use different pencils, blending tools, or shading techniques on each feature to further practice various methods.
- Complete the project by using colored mediums such as colored pencils, makers, or paints.
Other Fun drawing Art Projects from Kids Activities Blog
- Kids can practice drawing complex images by using the grid method.
- Younger kids can practice using various values with this easy printable.
- Older kids can practice pressure and values when shading with layered shapes.
- Kids enjoy our many “how-to-draw” printable pages, like this dragon!
- Further practice shading and blending with more realistic coloring pages like this tiger!
Did your kids enjoy practicing drawing facial features? Which facial feature drawing of theirs do they feel most proud of?