School-aged kids will practice form when drawing 3D egg shapes in this fun project. We’ve included a free printable to make this lesson easy for home or classroom use.
Exploring 3D shapes and Form
Artists use many techniques to create the illusion of 3D shapes. We will explore some of them in this egg project by combining lines with shadows and highlights. When kids understand lines and shading, they can draw a simple circle and then give it the appearance of a sphere. This element of art is known as “form.”
Painters create the appearance of form on a flat surface by using light, shadow, the appearance of an object’s contours, negative space, and the surrounding objects around the subject matter.
MasterClass
Related: Use lines to draw other 3D Shapes and Form.
Supplies Needed to Draw our 3D Eggs Art Project
- Egg Shapes Printed on Cardstock – Free Download Below
- Blank Cardstock
- Pencil
- Permanent Marker
- Crayons or Colored Pencils
- Ruler
- Scissors
Download the Egg Printable Here
This free printable assists kids in creating their egg shapes. Print this page on cardstock where kids can easily cut and trace the eggs onto their drawings.
Directions to Drawing 3D Eggs
Step 1
Begin by cutting out the egg shapes. Then, use a pencil to trace the shapes onto a blank sheet of cardstock.
Step 2
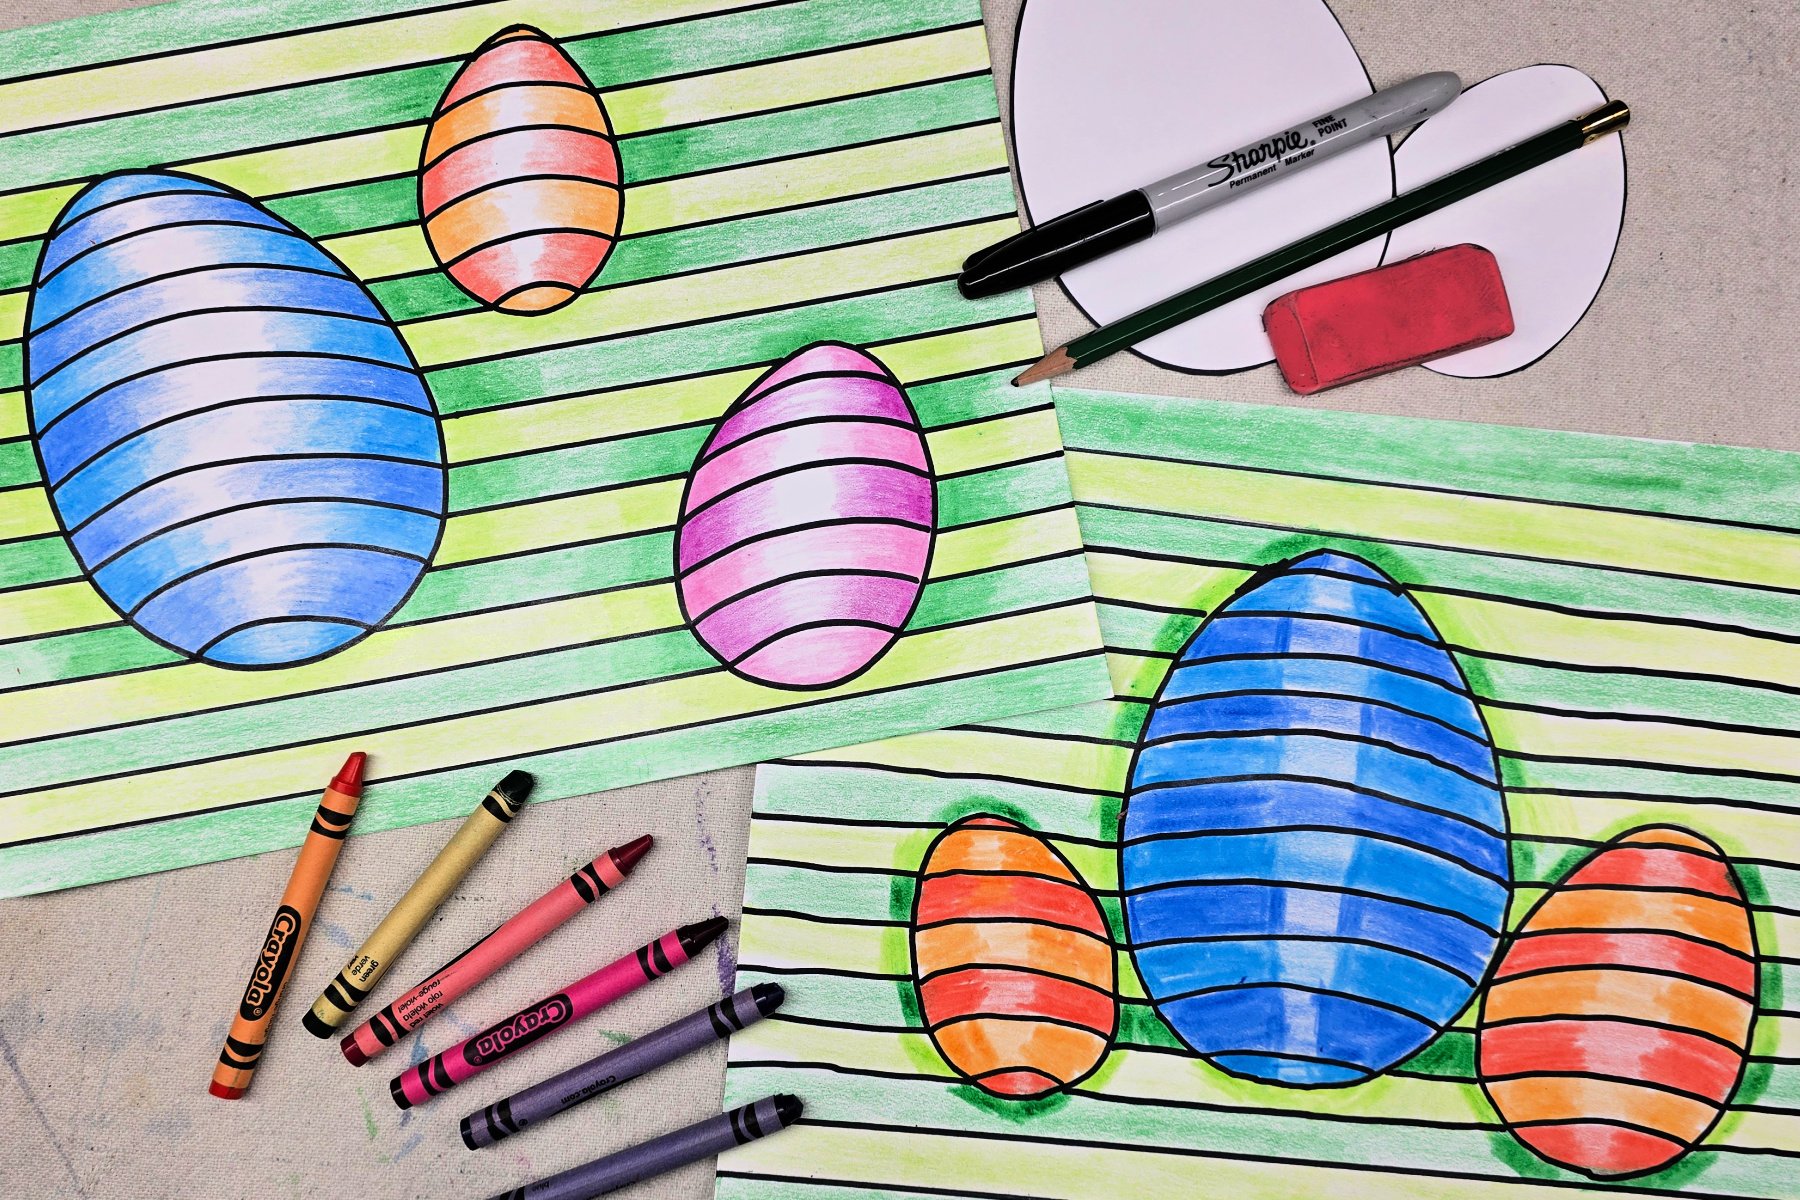
Use a pencil and ruler to draw horizontal lines across the page. Do not draw the lines through the egg shapes. We spaced our lines 1/2inch apart.
Step 3
Use the pencil to draw rainbow-shaped curved lines on the eggs. These curves should connect the horizontal lines on each side of the egg.
Step 4
Trace pencil lines with permanent marker. Erase any unwanted lines.
Step 5
Next, lightly color the background, or horizontal lines. Do no apply firm pressure to your crayon when coloring. We will use heavier pressure in the next step to create shadows.
Step 6
Then, use the same colors to color the space nearest the egg with a heavier pressure to create shadows. Kids will want to place their crayon on the edge of the egg and flick their wrist to color away from the egg. Flicking their wrist to color these short lines will lift their hand and better create a fading effect.
Step 7
Using the same flicking hand motion, color the insides of the egg. Again, begin at the outer edge of the egg, and color inward. Follow the rainbow lines on the egg and lift the crayon as you color. Continue to layer colors closer to the edge of the egg. We want to create a darker color along the edge of the egg and a lighter highlight within the center of the egg.
Finished Drawing 3D Eggs Art Project
I love how colorful our 3D egg drawings are! Since these projects are made on paper, they can be framed, clipped, or displayed in your preferred style alongside your holiday decorations.
Our Experience drawing this 3D Egg Art Project
This is a great introductory lesson for kids on creating a 3D illusion when drawing. It gives them an opportunity to see how lines, shadows, and highlights play a part in creating a more realistic drawing.
The curved lines give the illusion of the eggs popping out from the page. Adding in shadows and highlights furthers that effect. Drawing this project is an easy way for kids to practice these shadows and highlights without having to worry about proper placement based on the light source. Using this simple flicking motion of the wrist already creates the color gradients they need!
Prep Time
5 minutes
Active Time
25 minutes
Total Time
30 minutes
Difficulty
Medium
Estimated Cost
$1
Materials
- Egg Shapes Printed on Cardstock – Free Download
- Blank Cardstock
Tools
- Pencil
- Permanent Marker
- Crayons or Colored Pencils
- Ruler
- Scissors
Instructions
- Cut out the egg shapes. Then, use a pencil to trace the shapes onto a blank sheet of cardstock.
- Use a pencil and ruler to draw horizontal lines across the page. Do not draw the lines through the egg shapes. We spaced our lines 1/2inch apart.
- Use the pencil to draw rainbow-shaped curved lines on the eggs. These curves should connect the horizontal lines on each side of the egg.
- Trace pencil lines with permanent marker. Erase any unwanted lines.
- Lightly color the background, or horizontal lines. Do no apply firm pressure to your crayon when coloring. We will use heavier pressure in the next step to create shadows.
- Color the space nearest the egg with heavier pressure to create shadows. Kids will want to place their crayon on the edge of the egg and flick their wrist to color away from the egg. Flicking their wrist to color these short lines will lift their hand and better create a fading effect.
- Using the same flicking hand motion, color the insides of the egg. Again, begin at the outer edge of the egg, but color inward. Follow the rainbow lines on the egg and lift the crayon as you color. Continue to layer colors closer to the edge of the egg. We want to create a darker color along the edge of the egg and a lighter highlight within the center of the egg.
Notes
Drawing 3D Eggs Art Variations
- Skip the free printable and have kids draw their own egg shapes.
- Complete the project using watercolor or acrylic paints.
- Adapt shapes and color schemes to fit any holiday or season.
Drawing 3D Eggs Art Variations
- Skip the free printable and have kids draw their own egg shapes.
- Complete the project using watercolor or acrylic paints.
- Adapt shapes and color schemes to fit any holiday or season.
Other Fun Egg Art Projects from Kids Activities Blog
Did your kids enjoy drawing these 3D eggs? What color eggs did they create?